If you are a pet parent, learning exactly how to clean dog ears at home is an essential grooming skill. Routine ear maintenance keeps your furry best friend comfortable and prevents agonizing infections.
Many owners dread this task, fearing they might hurt their dog. However, with the right technique and veterinarian-approved supplies, ear cleaning becomes a simple, stress-free habit.
The Importance of Routine Ear Care for Your Dog
Ignoring your dog’s ear health directly leads to painful, expensive medical issues. Dirt, excess wax, and trapped moisture create the perfect breeding ground for aggressive yeast and bacterial infections.
- Regular cleaning physically removes this dangerous buildup before it causes inflammation.
- It allows you to spot early warning signs of ear mites or deep canal infections.
- Proactive ear care drastically reduces your pet’s chronic itching, head shaking, and overall discomfort.
Understanding Canine Ear Anatomy: Why They Get So Dirty
To clean effectively, you must understand how a dog’s ear is structured. Human ear canals are relatively short and straight, making them self-draining. A canine’s ear is completely different.
This unique biological design requires manual cleaning to stay healthy.
The L-Shaped Canal: A Natural Trap for Debris and Moisture
Dogs possess a steep, L-shaped ear canal. It drops straight down vertically before taking a sharp 90-degree turn horizontally toward the eardrum.
- This sharp bend acts as a biological trap.
- Water, heavy wax, and environmental debris easily fall in but cannot naturally drain out.
- Because the debris sits in a dark, warm environment, infections can multiply incredibly fast.
Breed Susceptibility: Floppy Ears vs. Upright Ears
Your dog’s specific ear shape heavily dictates how often they need cleaning. Genetics play a massive role in their overall ear health.
- Floppy-Eared Breeds: Dogs like Basset Hounds, Cocker Spaniels, and Golden Retrievers have heavy ear flaps (pinnas) that completely cover the canal. This blocks vital airflow, locking in heavy moisture and heat.
- Upright-Eared Breeds: Dogs with “prick” ears, like German Shepherds or French Bulldogs, have excellent airflow. However, their open canals easily catch blowing dust, pollen, and outdoor dirt.
Gathering Your Supplies: What You Need for a Safe Clean
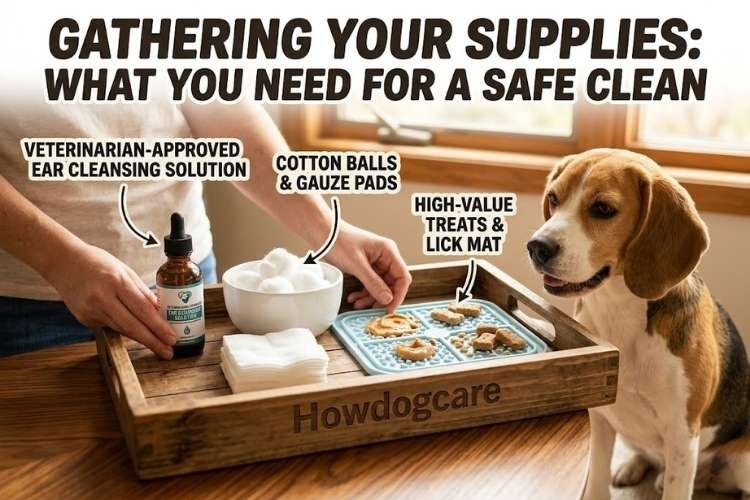
Preparation is the absolute secret to a successful grooming session. If you are scrambling to find supplies while holding a nervous dog, the process will fail.
Always gather your specific tools before calling your dog over.
Choosing a Veterinarian-Approved Ear Cleansing Solution
Never use harsh household chemicals in your dog’s delicate ear canal. You must purchase a high-quality, commercial ear flush designed specifically for canines.
- Choose a pH-balanced liquid solution containing drying agents like salicylic acid or witch hazel.
- These specific formulas actively dissolve heavy wax while safely evaporating leftover moisture.
- Strict Warning: Never use hydrogen peroxide, straight rubbing alcohol, or homemade vinegar mixtures. These violently sting inflamed tissue and cause severe pain.
Cotton Balls and Gauze Pads (The Safest Wiping Tools)
When wiping away the dissolved debris, you need soft, highly absorbent materials that will not scratch the sensitive skin inside the ear flap.
- Standard cotton balls or medical gauze pads are the safest, most effective options.
- They gently grip the oily wax and pull it away from the skin without leaving irritating residue.
- You will generally need 3 to 5 cotton balls per ear, depending on how dirty they are.
High-Value Treats and Lick Mats for Positive Reinforcement
You want your dog to actively look forward to their ear cleaning routine. Distraction and high-value rewards completely transform their anxiety into positive anticipation.
- Smear a textured silicone lick mat with dog-safe peanut butter or plain Greek yogurt.
- The repetitive licking motion naturally releases calming endorphins into the dog’s brain.
- Always keep extra training treats nearby to immediately reward them the second the cleaning is finished.
How to Clean Dog Ears at Home: The 7-Step Method

Once you have gathered your supplies, it is time to confidently begin the cleaning process. Learning exactly how to clean dog ears at home requires a structured, highly predictable routine.
By following this exact seven-step method, you actively protect your dog’s delicate ear structures. You will successfully remove deep, stubborn wax without causing any unnecessary stress or pain.
Step 1: Create a Calm, Well-Lit, and Stress-Free Environment
Never attempt to clean your dog’s ears when they are highly energetic or aggressively playing. You absolutely must wait until they are fully relaxed, ideally after a long, tiring walk.
- Choose a quiet, perfectly lit room where you can clearly see deep into the ear flap.
- Have your dog sit or lay comfortably, and offer them a high-value distraction, like a peanut butter lick mat.
- Approach them with completely calm, confident energy to instantly reduce their natural grooming anxiety.
Step 2: Perform a Pre-Clean Inspection for Redness or Odor
Before you introduce any liquid solution, you must physically inspect the ear for severe medical issues. Cleaning an actively infected ear at home will cause agonizing pain and severe damage.
- Gently lift the ear flap and look directly into the visible canal for bright redness or severe swelling.
- Smell the ear closely; a strong, foul odor resembling yeast or sweet cheese indicates an active infection.
- If you spot heavy discharge, bleeding, or extreme sensitivity, absolutely stop immediately and consult your veterinarian.
Step 3: Gently Hold the Ear Flap (Pinna) Upright and Open
To properly clean the deep, biological L-shape of a canine ear, you must physically straighten the canal. Holding the ear flap correctly is crucial for the liquid to reach the bottom.
- Firmly but gently grasp the very tip of your dog’s ear flap (the pinna) with your non-dominant hand.
- Pull the flap straight up and slightly backward to open the canal completely.
- Maintain this gentle tension; it prevents the dog from suddenly jerking and injuring themselves on the bottle tip.
Step 4: Carefully Squeeze the Cleaning Solution into the Canal
Now, you must aggressively flush the ear to break down heavy, stubborn wax deposits. Do not be overly cautious with the liquid; the canal needs to be completely filled.
- Hold the bottle of veterinarian-approved ear cleanser in your dominant hand.
- Squeeze a generous, steady stream of liquid directly into the open ear canal until it completely pools at the top.
- Crucial Safety Rule: Never push the hard plastic applicator tip deep into the ear, and never let it directly touch the skin to avoid bacterial contamination.
Step 5: Massage the Base of the Ear (Listen for the “Squish” Sound)
This is the absolute most critical step for effectively breaking up deeply trapped debris. The liquid solution cannot work unless you physically agitate it deep inside the horizontal canal.
- Keep holding the ear flap straight up with one hand.
- Place your other hand firmly at the very base of the ear, right where it meets the jawline.
- Vigorously massage the cartilage in a deep, circular motion for 20 to 30 seconds.
- You should distinctly hear a loud, liquid “squish” or “slosh” sound, which confirms the cleanser is actively working.
Step 6: Step Back and Let Your Dog Shake Their Head Naturally
After you finish massaging, immediately release the ear flap and take a large step backward. Your dog’s natural biological reflex is your absolute best tool for removing the dissolved wax.
- Your dog will instinctively and violently shake their head.
- This rapid shaking action acts like a powerful centrifuge, forcing the liquid and heavy debris out of the deep L-shaped canal.
- Keep a towel handy, as this step will rapidly send dirty solution flying across the room.
Step 7: Wipe Away the Loosened Debris Gently
Once the dog finishes shaking, all the deeply trapped wax and dirt will sit visibly in the outer ear flap. You must manually wipe this away to prevent it from sliding back down.
- Take a clean, dry cotton ball or soft gauze pad and gently wipe the inside of the ear flap.
- Sweep out all the visible brown or black debris from the intricate folds of the cartilage.
- The Golden Rule: Only wipe the crevices you can easily see. Never push the cotton ball down blindly into the dark ear canal.
Crucial Mistakes to Avoid During the Cleaning Process

When figuring out exactly how to clean dog ears at home, knowing what to strictly avoid is just as important as knowing what to do. Well-meaning pet parents often accidentally cause severe injury by using improper tools or harsh, unapproved liquids.
You must prioritize safety and gentleness over achieving a perfectly spotless ear canal.
The Danger of Q-Tips: Why You Should Never Insert Cotton Swabs
Reaching for a standard human cotton swab is the absolute most dangerous grooming mistake you can make. The canine ear canal is highly delicate, and blind insertion easily causes catastrophic damage.
- Q-tips do not pull heavy wax out; they violently push it deeper into the narrow, horizontal canal.
- This aggressive packing creates a dense, rock-hard wax plug directly against the eardrum, practically guaranteeing a severe infection.
- If your dog suddenly flinches or jerks their head, the sharp swab could instantly puncture the eardrum, causing agonizing pain and permanent hearing loss.
Why Homemade Vinegar or Alcohol Solutions Can Cause Severe Pain
The internet is flooded with cheap, DIY ear-cleaning recipes, but using them is highly irresponsible and dangerous. The skin inside a dog’s ear is incredibly sensitive and highly prone to microscopic abrasions.
- Straight rubbing alcohol and harsh apple cider vinegar violently burn sensitive, slightly inflamed tissue.
- Pouring these highly acidic liquids into a sore ear instantly causes agonizing pain, completely destroying your dog’s trust in you.
- You must stick strictly to pH-balanced, veterinarian-formulated cleansers designed specifically for canine dermatological health.
Plucking Ear Hair: Why You Should Leave It to the Professionals
Certain breeds, like Poodles, Doodles, and Schnauzers, genetically grow thick, heavy hair directly inside their ear canals. While removing it can improve vital airflow, aggressive plucking at home is highly discouraged by modern veterinarians.
- Violently ripping the hair out at the root creates hundreds of microscopic open wounds inside the warm, moist ear.
- These tiny bleeding tears actively invite aggressive, deeply rooted bacterial infections.
- If dense ear hair is actively trapping severe moisture, you must have a professional groomer or your veterinarian safely manage its removal.
You might also like
Recognizing the Warning Signs of a Severe Ear Infection
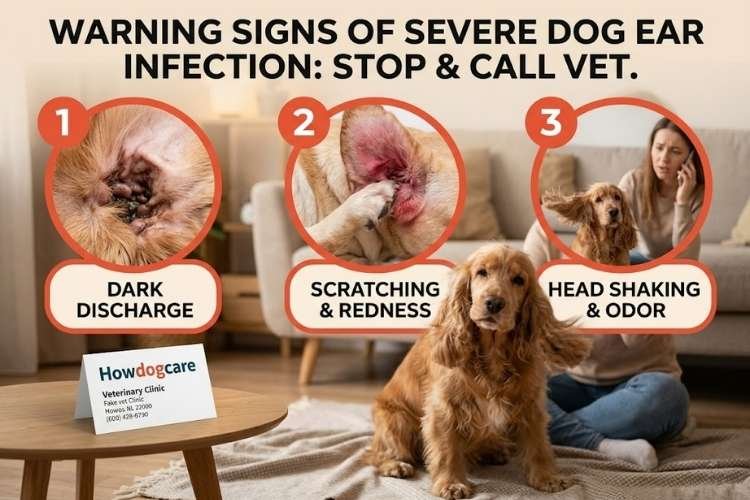
At-home maintenance is purely a preventative measure, not a clinical medical treatment. You must possess the mature judgment to recognize when a dirty ear has aggressively crossed the line into a severe medical emergency.
Treating an active infection with standard over-the-counter flush will only make the painful condition significantly worse.
Dark, Coffee-Ground Discharge (Ear Mites vs. Yeast)
The specific color and texture of the ear debris tell a highly detailed medical story. Normal, healthy ear wax is usually pale yellow or light brown and relatively minimal.
- If you suddenly notice thick, crumbly black discharge that perfectly resembles dry coffee grounds, your dog likely has a highly contagious ear mite infestation.
- Conversely, a heavy, greasy, dark brown discharge strongly indicates an aggressive fungal yeast overgrowth.
- Both of these severe conditions require highly specific, targeted prescription medication to fully eradicate, not just a standard cosmetic cleaning.
Foul Odors, Constant Head Shaking, and Excessive Scratching
A healthy canine ear smells perfectly neutral and sits completely comfortably on the dog’s head. If the biological environment inside the canal fails, your dog will show obvious, frantic physical symptoms.
- If the ear visibly radiates a rotting, intensely sweet, or distinctly cheesy odor, a bacterial infection is actively spreading.
- Watch closely for frantic, continuous head shaking or obsessive, violent scratching at the base of the ear.
- These are primary, undeniable signs that your dog is experiencing intense, deep-canal pain and extreme itchiness.
Knowing When to Stop Cleaning and Call Your Veterinarian
Mastering exactly how to clean dog ears at home also means knowing exactly when to stop the session entirely. Pushing a terrified, hurting dog past their breaking point is highly dangerous for both of you.
- If your dog violently yelps, aggressively pulls away, or shows a distinct, permanent head tilt, you must halt the grooming session immediately.
- Pouring liquid into an actively infected, heavily swollen, and completely closed ear canal only drives the trapped bacteria deeper toward the brain.
- In these critical moments, immediate veterinary intervention and heavy prescription antibiotics are the only safe, humane options.
Frequently Asked Questions (FAQs) About Dog Ear Cleaning
Managing your dog’s hygiene naturally raises highly specific, situational concerns. Even when you know the basic steps of how to clean dog ears at home, you might second-guess your routine.
1. Exactly how often should I clean my dog’s ears?
There is no universal schedule because every single dog produces ear wax at a completely different rate. You should only clean a dog’s ear when it is visibly dirty or smells slightly musky.
- Floppy-eared dogs and avid swimmers usually require a thorough cleaning every 2 to 4 weeks.
- Upright-eared dogs with healthy, dry canals may only need a cleaning every few months.
- Crucial Warning: Never over-clean a healthy ear. Stripping away the natural, healthy wax violently disrupts the normal biological flora and directly causes painful irritation.
2. Can I just use standard baby wipes to clean the inside of the ear?
No, you should strictly avoid using human baby wipes for canine ear maintenance. While they seem incredibly gentle, they are chemically formulated specifically for human skin pH.
- Standard baby wipes heavily contain artificial fragrances and harsh chemical preservatives that instantly irritate the delicate canine ear canal.
- More importantly, baby wipes leave behind a massive layer of trapped moisture.
- This residual water creates the absolute perfect, dark breeding ground for highly aggressive fungal yeast infections.
3. What if my dog absolutely panics and hates having their ears touched?
If your dog displays severe grooming anxiety, you cannot simply force them into submission. Pinning down a terrified dog easily leads to a severe bite injury and permanent psychological trauma.
- You must actively practice desensitization training over several weeks before attempting a liquid flush.
- Start by simply lifting their ear flap for one second, immediately praising them, and giving a high-value jackpot treat.
- Gradually increase the handling time daily. If their panic remains completely unmanageable, you must rely on a fear-free certified veterinarian or professional groomer.
4. Should I proactively clean my dog’s ears immediately after they go swimming?
Yes, proactive cleaning after any heavy water exposure is the single best way to prevent canine “swimmer’s ear.” Lake water and chlorinated pools are heavily packed with microscopic bacteria.
- When your dog swims, dirty water easily flows past the ear flap and becomes deeply trapped at the bottom of the L-shaped canal.
- Using a veterinarian-approved, salicylic acid-based cleanser immediately after swimming serves two vital purposes.
- It safely flushes out the environmental bacteria while actively drying out the trapped, residual moisture deep inside the horizontal canal.
Conclusion: Keeping Your Dog’s Ears Fresh and Infection-Free
Taking absolute control of your dog’s preventative healthcare is one of the most deeply rewarding aspects of pet ownership. By mastering exactly how to clean dog ears at home, you actively protect your furry companion from agonizing pain and chronic infections.
Always rely heavily on high-value treats, prioritize a calm environment, and strictly use veterinarian-approved cleansing solutions.
By perfectly balancing routine observation with gentle, safe cleaning techniques, you ensure your best friend stays incredibly comfortable, completely itch-free, and delightfully fresh-smelling for their entire life.