Hearing the sharp click-clack of your dog’s nails on the hardwood floor is a clear, unavoidable warning sign. If you are urgently wondering how to trim dog nails safely, you are certainly not alone in your anxiety.
Many pet parents deeply dread this specific grooming task due to the intense fear of accidentally hurting their furry best friend. However, mastering this essential at-home skill actively protects your dog’s critical joint health and saves you countless expensive trips to the groomer. Let’s break down the exact, stress-free method.
Conquering the Clipper: Why At-Home Nail Trims Matter
Taking absolute charge of your dog’s paw care in your own living room dramatically reduces their overall grooming anxiety. Busy veterinary clinics and commercial grooming salons are often loud, chaotic, and highly stressful environments.
By learning how to trim dog nails safely at home, you completely control the pacing of the session. You can take frequent breaks, offer high-value rewards, and instantly transform a terrifying ordeal into a highly positive bonding experience.
Understanding Canine Anatomy: What Exactly Are You Cutting?
Before you ever pick up a sharp pair of clippers, you absolutely must understand the biological structure of a canine claw. Blindly cutting into the nail without grasping the underlying anatomy is a guaranteed recipe for disaster and pain.
A dog’s nail consists of a hard, keratinized outer shell that strictly protects a highly sensitive inner core.
What is the “Quick” and Why Does It Bleed?
The “quick” is the soft, fleshy center running directly through the middle of the canine nail. It contains a live, actively flowing blood vessel and an extremely delicate nerve ending.
- Cutting directly into the quick causes a sudden, sharp burst of severe pain for your dog.
- Because it contains an active blood vessel, nicking the quick will cause immediate, surprisingly heavy bleeding.
- On light-colored nails, the quick is highly visible as a distinct pink tube near the base of the claw.
The Silent Danger of Overgrown Nails on Joint Health
Ignoring your dog’s pedicure routine is not just a cosmetic issue; it is a severe medical hazard. When nails grow excessively long, they constantly strike the hard ground with every single step your dog takes.
- This constant ground contact violently forces the dog’s toes to bend backward unnaturally.
- Over time, this severely altered posture places massive, daily stress directly on their delicate paw and leg joints.
- Leaving nails chronically overgrown directly accelerates early-onset arthritis and causes highly painful, permanent skeletal misalignment.
Gathering Your Grooming Toolkit: Essential Supplies
Using cheap, dull, or inappropriate human tools will violently crush the nail, causing extreme, unnecessary pressure and pain. To succeed, you must invest in high-quality, purposely built canine grooming equipment.
Having the correct tools prepared beforehand is the first major secret to learning how to trim dog nails safely.
Scissor-Style Clippers vs. Guillotine Clippers: Which is Better?
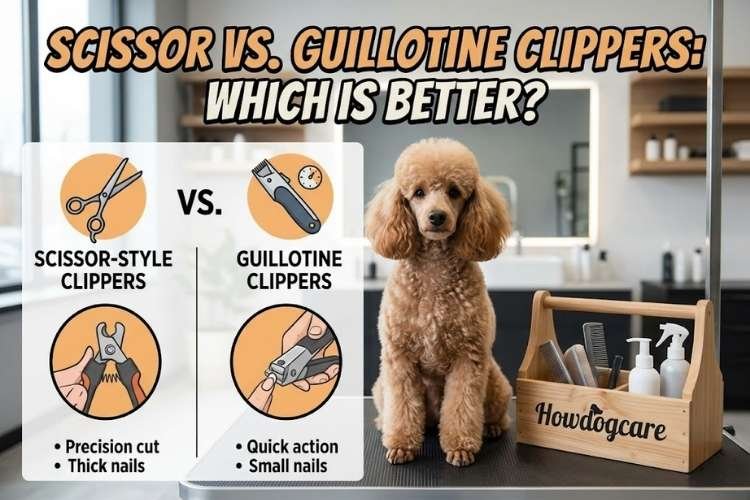
When shopping for manual clippers, you will generally encounter two primary designs. Professional groomers heavily favor one specific style for safety and precision.
- Scissor-Style Clippers: Highly recommended. They operate exactly like heavy-duty pliers, providing a clean, incredibly powerful, and highly precise cut through thick nails.
- Guillotine Clippers: Generally discouraged for beginners. You must thread the dog’s nail through a small metal hole, which often awkwardly squeezes and painfully crushes the nail before the blade finally cuts.
Using a Nail Grinder (Dremel) for Smooth, Stress-Free Edges
If your dog absolutely panics at the sharp “snapping” sound of manual clippers, a rotary nail grinder is a phenomenal, stress-free alternative. Tools like a pet-safe Dremel utilize a rapidly spinning sandpaper drum to gently file the nail down.
- Grinders allow you to slowly erase the nail tip millimeter by millimeter, drastically reducing the risk of hitting the quick.
- They leave a perfectly smooth, rounded edge, completely eliminating sharp, jagged scratches on your hardwood floors or skin.
- You must gently introduce the buzzing sound of the grinder over several days to avoid initially startling your dog.
The Non-Negotiable Lifesaver: Styptic Powder for Emergencies
Even highly experienced veterinary technicians occasionally nick a hidden quick. You absolutely must never begin a nail trimming session without a reliable blood-clotting agent sitting open right next to you.
- Styptic powder (like Kwik Stop) contains highly effective chemical coagulants that instantly seal the broken blood vessel.
- If an accident happens, you simply pinch a small pinch of the powder and press it firmly against the bleeding nail tip for ten seconds.
- In a desperate emergency, tightly packed cornstarch or baking flour can temporarily slow the bleeding until you get styptic powder.
Pre-Trim Preparation: Setting Up for a Fear-Free Session
Never attempt to aggressively rush into a grooming session when you or your dog are heavily stressed. Dogs are incredibly empathetic creatures; if you approach the clippers with nervous, shaky energy, they will instantly panic.
Setting the perfect stage directly guarantees a much smoother, safer cutting process.
Creating a Calm, Well-Lit Environment
Lighting is arguably the most critical environmental factor when learning how to trim dog nails safely. You absolutely cannot avoid the quick if you cannot clearly see it.
- Choose a quiet, highly familiar room completely free of sudden loud noises or chaotic family traffic.
- Sit down near a massive window with bright, natural sunlight, or set up a powerful, highly focused LED headlamp.
- Brilliant lighting allows you to perfectly illuminate the interior structure of the nail, making the dark quick much easier to spot.
The Power of High-Value Distraction Treats (Peanut Butter & Lick Mats)
Distraction is a highly powerful, scientifically proven tool for managing canine anxiety. You want your dog entirely focused on a delicious reward rather than the scary metal clippers near their paws.
- Heavily smear a textured silicone lick mat with dog-safe, xylitol-free peanut butter or plain Greek yogurt.
- The constant, repetitive motion of licking naturally releases highly calming endorphins directly into your dog’s brain.
- This instantly creates a powerful, highly positive association, teaching them that nail trims equal incredibly tasty, rare treats.
Desensitizing Your Dog to Paw Handling (Days Before the Cut)
Most dogs naturally hate having their feet forcefully restrained. If you only touch their paws when you are wielding sharp clippers, they will aggressively pull away every single time.
- Start gently massaging your dog’s paws daily while they are relaxed entirely on the couch.
- Softly isolate their individual toes, gently squeeze their paw pads, and playfully tap their nails with a completely dull spoon.
- Immediately reward them with a tiny, high-value treat every single time they allow you to handle their feet without instantly pulling away.
How to Trim Dog Nails Safely: The 7-Step Method
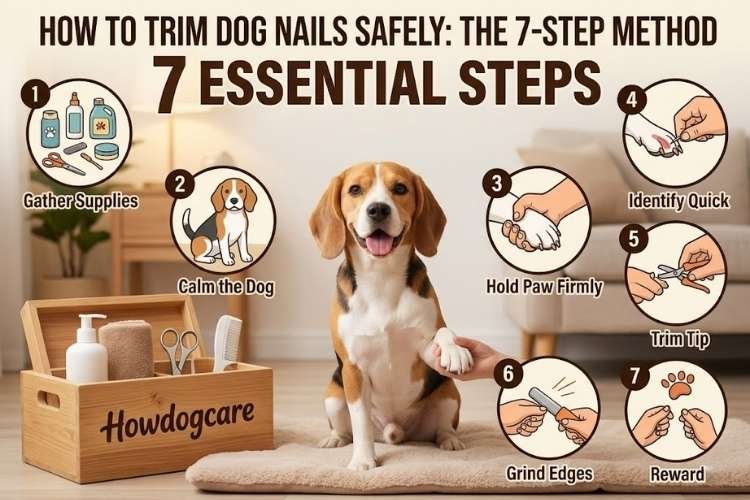
Now that you have the right tools and a perfectly calm environment, it is time for the main event. Learning how to trim dog nails safely requires a systematic, highly predictable approach.
By closely following this exact seven-step method, you completely eliminate the stressful guesswork. You will actively protect your dog from accidental injury while drastically building their confidence in your handling skills.
Step 1: Secure Your Dog in a Safe, Comfortable Restraint Hold
Proper physical positioning is your very first line of defense against sudden, dangerous jerks. You must stabilize their body without making them feel trapped, pinned down, or panicked.
- For small dogs, hold them securely in your lap with your non-dominant arm gently draped over their back to prevent them from squirming away.
- For large dogs, have them stand or lie completely flat on their side while you gently lean your upper body weight over their shoulders.
- Never use aggressive force; if your dog violently thrashes, immediately stop and try again later when they are completely calm.
Step 2: Isolate the Paw and Firmly Expose the Nail
Once your dog is physically secure, pick up one paw and hold it firmly but gently in your non-dominant hand. You need total, uninterrupted control over the individual toe you are cutting.
- Place your thumb directly on top of the toe and your index finger firmly underneath the main, fleshy paw pad.
- Gently squeeze your fingers together to physically push the nail outward and separate it clearly from the surrounding thick fur.
- This firm grip prevents the toe from painfully twisting when the clippers apply pressure.
Step 3: Identify the Quick Before Making Any Cuts
Never blindly squeeze the clipper handles without mapping out the internal structure of the claw first. This careful visual inspection is the absolute most critical part of learning how to trim dog nails safely.
- On clear, white, or lightly colored nails, look closely for the pink tube running through the center; this is the live quick.
- Your strict, non-negotiable goal is to cleanly cut the dead, hollow tip sitting exactly two millimeters safely in front of that pink line.
Step 4: The 45-Degree Angle Rule for the Perfect Clip
The specific angle of your cut directly determines how comfortably your dog will walk on hard floors afterward. Cutting completely straight across awkwardly blunts the nail and leaves incredibly sharp, uncomfortable edges.
- Hold your heavy-duty scissor clippers at a strict 45-degree angle, pointing directly away from the dog’s soft paw pad.
- This specific, slanted angle perfectly mimics the natural slope of the nail as it physically wears down outside on the pavement.
Step 5: Taking Tiny, Incremental Slivers (The “Shaving” Technique)
The biggest, most painful mistake beginners make is aggressively trying to remove the entire overgrown tip in one single, massive clip. Instead, you absolutely must adopt the highly cautious “shaving” method.
- Take incredibly tiny, one-millimeter slivers off the tip of the nail one at a time.
- After every single tiny cut, stop and look directly at the newly exposed flat tip of the nail to aggressively check your proximity to the quick.
- If you see a small, dark, circular dot appearing directly in the center of the chalky white nail edge, stop cutting immediately—you are directly on top of the quick.
Step 6: Finding and Trimming the Hidden Dewclaw
Many pet parents completely forget to check the dewclaw, which acts exactly like the dog’s functional “thumb.” Because this specific nail never touches the ground to wear down naturally, it grows incredibly fast.
- Locate the dewclaw slightly higher up on the inside of your dog’s front legs (and occasionally on their back legs).
- Trim this hidden nail regularly, as severely overgrown dewclaws easily curl backward directly into the flesh, causing highly painful, deep skin infections.
Step 7: Reward, Praise, and Release Immediately
The second you successfully finish the final nail, you must throw a massive, highly enthusiastic celebration. Your dog urgently needs to associate the end of this mildly stressful process with incredible, high-value rewards.
- Immediately offer a premium jackpot treat, like a piece of plain boiled chicken or a large spoonful of dog-safe peanut butter.
- Shower them with incredibly loud verbal praise and happy physical affection to positively reinforce their calm behavior for the very next session.
The Ultimate Challenge: How to Safely Cut Black Dog Nails
For many pet parents, dark claws are completely terrifying because the pink internal quick is entirely invisible from the outside. When learning how to trim dog nails safely, mastering the technique for black nails is your ultimate graduation test.
You cannot rely on seeing a pink line through the keratin shell. Instead, you must learn to read the specific structural changes on the freshly cut surface of the nail itself.
Looking for the “Bullseye” on the Underside of the Nail
To safely cut a black nail, you must strictly use the incremental “shaving” technique mentioned earlier. After clipping off a tiny, one-millimeter sliver, look directly at the flat, freshly cut tip head-on.
- Initially, the cut surface will look completely dry, chalky, and whitish-gray.
- As you continue shaving closer to the quick, a solid black dot will suddenly appear perfectly centered inside that white, chalky outer ring.
- This distinct pattern looks exactly like a tiny target or “bullseye.” The absolute second you see this black center, stop cutting immediately, as you are resting directly against the sensitive nerve.
You might also like
Troubleshooting: What to Do If You Cut the Quick
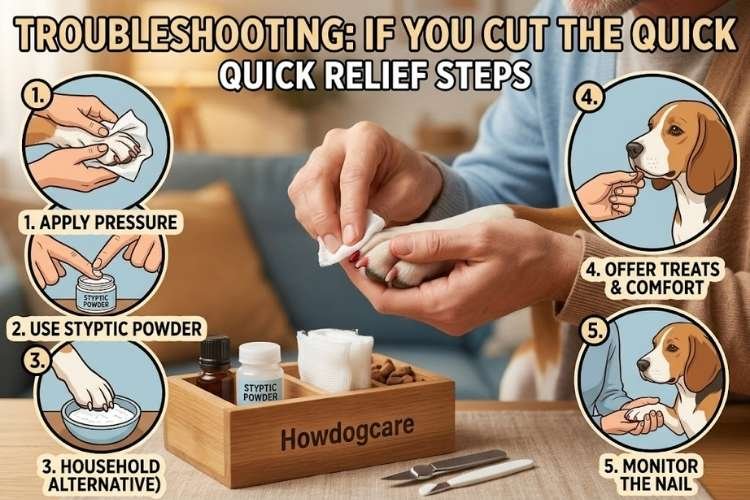
Even professional groomers and seasoned veterinarians occasionally nick a hidden quick. If you accidentally cut too deep and draw blood, your immediate reaction dictates exactly how your dog will respond.
The absolute worst thing you can do is panic, scream, or drop your dog, as this instantly teaches them that nail trims are highly dangerous events.
Stopping the Bleeding Fast with Styptic Powder (or Cornstarch)
A bleeding quick looks much scarier than it actually is, but it will bleed surprisingly heavily if left untreated. You must act calmly, swiftly, and decisively to seal the broken blood vessel.
- Immediately grab a generous pinch of your pre-opened styptic powder (like Kwik Stop) between your thumb and index finger.
- Press the powder firmly and directly into the bleeding nail tip, holding strict, continuous pressure for at least 10 to 15 seconds.
- If you do not have commercial powder, tightly pack a thick paste of cornstarch or baking flour against the wound to force a temporary clot.
Calming Your Dog (and Yourself) After a Mistake
If you nick the quick, your dog will likely yelp, violently pull their paw back, and attempt to flee. Do not try to aggressively force them back into the restraint hold to finish the other paws.
- Immediately offer them a massive “jackpot” reward—like a large spoon of peanut butter—to rapidly distract them from the sharp, sudden sting.
- Speak in a highly soothing, upbeat, and cheerful tone to reassure them that everything is perfectly fine.
- End the grooming session immediately for the day. You can always trim the remaining nails tomorrow once you have both completely relaxed.
Knowing Your Limits: When to Stop and Call the Vet or Groomer
At-home grooming is incredibly rewarding, but prioritizing your dog’s safety occasionally means admitting defeat. You must possess the mature judgment to recognize when a specific situation vastly exceeds your personal skill level.
Pushing a terrified dog past their breaking point destroys their trust and dramatically increases the risk of a severe bite injury.
Recognizing Signs of Extreme Fear, Panic, or Aggression
Some rescue dogs carry severe, deep-rooted trauma specifically related to having their feet handled. If your dog crosses the threshold from mild anxiety into blind panic, you must stop immediately.
- Watch closely for dangerous warning signs like stiffening muscles, low growling, showing teeth, or violently thrashing.
- If your dog continuously attempts to bite the clippers or your hands, do not attempt to muscle through the session.
- Schedule an appointment with a fear-free certified veterinary clinic where professionals can safely manage their severe grooming anxiety.
Dealing with Severely Overgrown, Curling, or Ingrown Nails
If a dog has gone months or years without a proper trim, their nails will physically curl backward like ram horns. In severe neglect cases, these sharp tips pierce directly into the soft, fleshy paw pad.
- Never attempt to cut an embedded, ingrown nail at home. Pulling the freshly cut nail out of the wound will cause agonizing pain and massive bleeding.
- This requires immediate, sterile veterinary intervention, strong prescription antibiotics, and often heavy medical sedation.
- Once the veterinarian safely resets the heavily overgrown nails, you can easily resume routine maintenance trims at home.
Frequently Asked Questions (FAQs) About Dog Nail Care
Managing your dog’s paws naturally raises highly specific, situational concerns. Here are the authoritative, expert answers to the absolute most common queries pet parents have about canine nail health.
1. How often should I trim my dog’s nails?
Most indoor dogs require a standard nail trim every 3 to 4 weeks to maintain optimal joint health. However, if you actively hear their nails loudly clicking on your hard floors, they are already entirely too long and need immediate clipping.
2. What happens if I never cut my dog’s nails?
Severely overgrown nails violently force the dog’s toes backward, permanently damaging their skeletal alignment. This causes immense daily pain, severely accelerates crippling joint arthritis, and significantly increases the massive risk of violently tearing a nail off completely on a carpet loop.
3. Can I use human nail clippers on my dog?
Absolutely not. Human nail clippers are designed perfectly flat, which violently crushes a dog’s thick, cylindrical claw before finally cutting it. This squeezing action causes extreme, unnecessary pain and will instantly shatter the outer keratin shell of the nail..
4. Does walking my dog on concrete file their nails down naturally?
Yes, brisk, daily walks on abrasive surfaces like concrete sidewalks will naturally file down the tips of your dog’s nails. However, this natural friction rarely reaches the hidden dewclaws, and lightweight dogs simply do not generate enough heavy ground friction to entirely skip manual trimming.
Conclusion: Stepping Forward with Confidence and Healthy Paws
Taking absolute control of your dog’s pedicure routine is one of the most deeply empowering skills a pet parent can develop. While it requires patience and a steady hand, mastering exactly how to trim dog nails safely ensures your companion walks comfortably for their entire life.
Equip yourself with heavy-duty tools, rely heavily on high-value peanut butter distractions, and always utilize the cautious “shaving” method. By transforming this dreaded chore into a highly positive bonding experience, you will completely eliminate grooming anxiety and protect your dog’s vital joint health for years to come.